HCU Gateway Deployment
This is a step-by-step guide for deploying the HCU (HaaS Connector for Universe) Gateway Virtual Machine into a customer environment.
The HCU Gateway is a VM appliance deployed into the customer's Azure environment that provides three core services:
- Monitor: an HTTP health check endpoint used by Azure load balancer probes
- Universe Backend Proxy: a TLS-terminated reverse proxy enabling connectivity to the underlying UniVerse database from the Biza network boundary
- Magic Link: a drop-in replacement for the Biza Management API's SSO token endpoint, allowing MyViewPoint to generate dashboard access tokens locally without requiring a private link back to Biza
The HCU Gateway replaces the former A2U Gateway. See Upgrading from A2U Gateway for migration details.
Architecture
The appliance runs on Ubuntu 24.04 LTS and is configured entirely at boot via Azure cloud-init user-data (YAML). It exposes three services through HAProxy:
                     ┌──────────────────────────────────────┐
                     │            HCU Gateway               │
                     │                                      │
                     │  :port  → Monitor (/monitor)         │
                     │  :port  → Universe (TLS) → Backend   │
                     │  :port  → Magic Link                 │
                     └──────────────────────────────────────┘
| Service | Description |
|---|---|
| Monitor | HTTP health check endpoint at /monitor. Used by Azure load balancer health probes. |
| Universe Backend Proxy | TLS-terminated reverse proxy to the UniVerse database. Automatically generates self-signed certificates on each boot. |
| Magic Link | SSO token signing service — a drop-in replacement for the Biza Management API's dashboard SSO endpoint. |
Magic Link Service
Magic Link is a drop-in replacement for the Management API's SSO token endpoint. By running this service on the HCU Gateway within the customer's network, MyViewPoint can generate dashboard access tokens locally, removing the need for a private link back to Biza.
The service exposes a single endpoint:
POST /dio-au/v0/dashboard/sso/request
- Protected by HTTP Basic Auth (credentials must match MyViewPoint's
cdrConsentApiUsername/cdrConsentApiPassword) - Accepts
{"principalId": "...", "userId": "..."}as JSON body - Returns a JWT signed with HMAC-SHA512
See Dashboard SSO for the full
claim reference this service must produce — in particular the sub claim format, the required nbf/exp window,
and why the hmac-secret must be signed over as decoded bytes rather than the base64 string.
The hmac-secret configured in the HCU Gateway must be a base64-encoded HMAC-SHA512 key that matches the configuration in the customer's HaaS Space. The basic-auth-username and basic-auth-password must match the credentials configured in MyViewPoint (see MyViewPoint Installation).
Assumptions
- The load balancer intended for exposure to the Biza HaaS environment has already been created.
- Connectivity is established between the network in which the VMs will live, the load balancer for exposure, and the target IPs.
- If using Magic Link, the HMAC secret and basic auth credentials have been coordinated with the customer's HaaS Space and MyViewPoint configurations.
- A DNS name must be configured that MyViewPoint can resolve to reach the HCU Gateway on the Magic Link port (e.g.,
hcu-gateway.internal.example.com).
User Data Configuration
The Virtual Machine accepts user data for configuration via a YAML document with two top-level keys:
haproxy (required)
| Field | Description |
|---|---|
port | Port for the monitor/stats endpoint (serves /monitor). Used as the health check port. By convention, use 11000. |
services | A map of named services to proxy. Each service has the fields below. |
You must configure at least one universe service that points to your UniVerse database. This is the backend that HCU connects to.
Service fields:
| Field | Description |
|---|---|
backend-targets | List of "host:port" backend addresses to proxy to. |
frontend-port | Port to listen on for this service. By convention, the first universe service uses 11001. |
type | universe (The only supported type) — TLS termination with auto-generated self-signed certificate. |
check-interval | Health check interval in milliseconds (optional, default 60000). |
magic_link (required)
The Magic Link service is mandatory — MyViewPoint relies on it for dashboard SSO token issuance.
| Field | Description |
|---|---|
port | Frontend port for the Magic Link service. By convention, use 8080. |
basic-auth-username | HTTP Basic Auth username for the Magic Link endpoint. Must match MyViewPoint's cdrConsentApiUsername. |
basic-auth-password | HTTP Basic Auth password for the Magic Link endpoint. Must match MyViewPoint's cdrConsentApiPassword. |
hmac-secret | Base64-encoded HMAC-SHA512 secret for signing JWS tokens. Must match the customer's HaaS Space configuration. |
audience | Realm issuer URI used as the aud claim in generated tokens. |
Example Configuration
You must update the target addresses and credentials to match your network topology and deployment.
---
haproxy:
  port: 11000
  services:
    universedb:
      backend-targets:
        - "10.0.0.5:31438"
      frontend-port: 11001
      type: universe
      check-interval: 60000

magic_link:
  port: 8080
  basic-auth-username: wecarebank
  basic-auth-password: supersecretpassword
  hmac-secret: wGbdGu7EFjM7dJ0KI/1pDCPLh5vpXE2NARk757ndUi1xTYENNJAiC72/ScY72GCiC27iKqqI6osXFyvPRn1vKw==
  audience: https://idp.example.com/biza-dashboard-auth
Unlimited services can be added as long as the key used is unique.
Setup Procedure
Verify Image Availability
Verify visibility of the Biza Shared Image Gallery and its contents. The HCU Gateway image is published as Biza_Marketplace/HCU_Gateway/latest.
Please request access to the image by contacting us via our support desk.
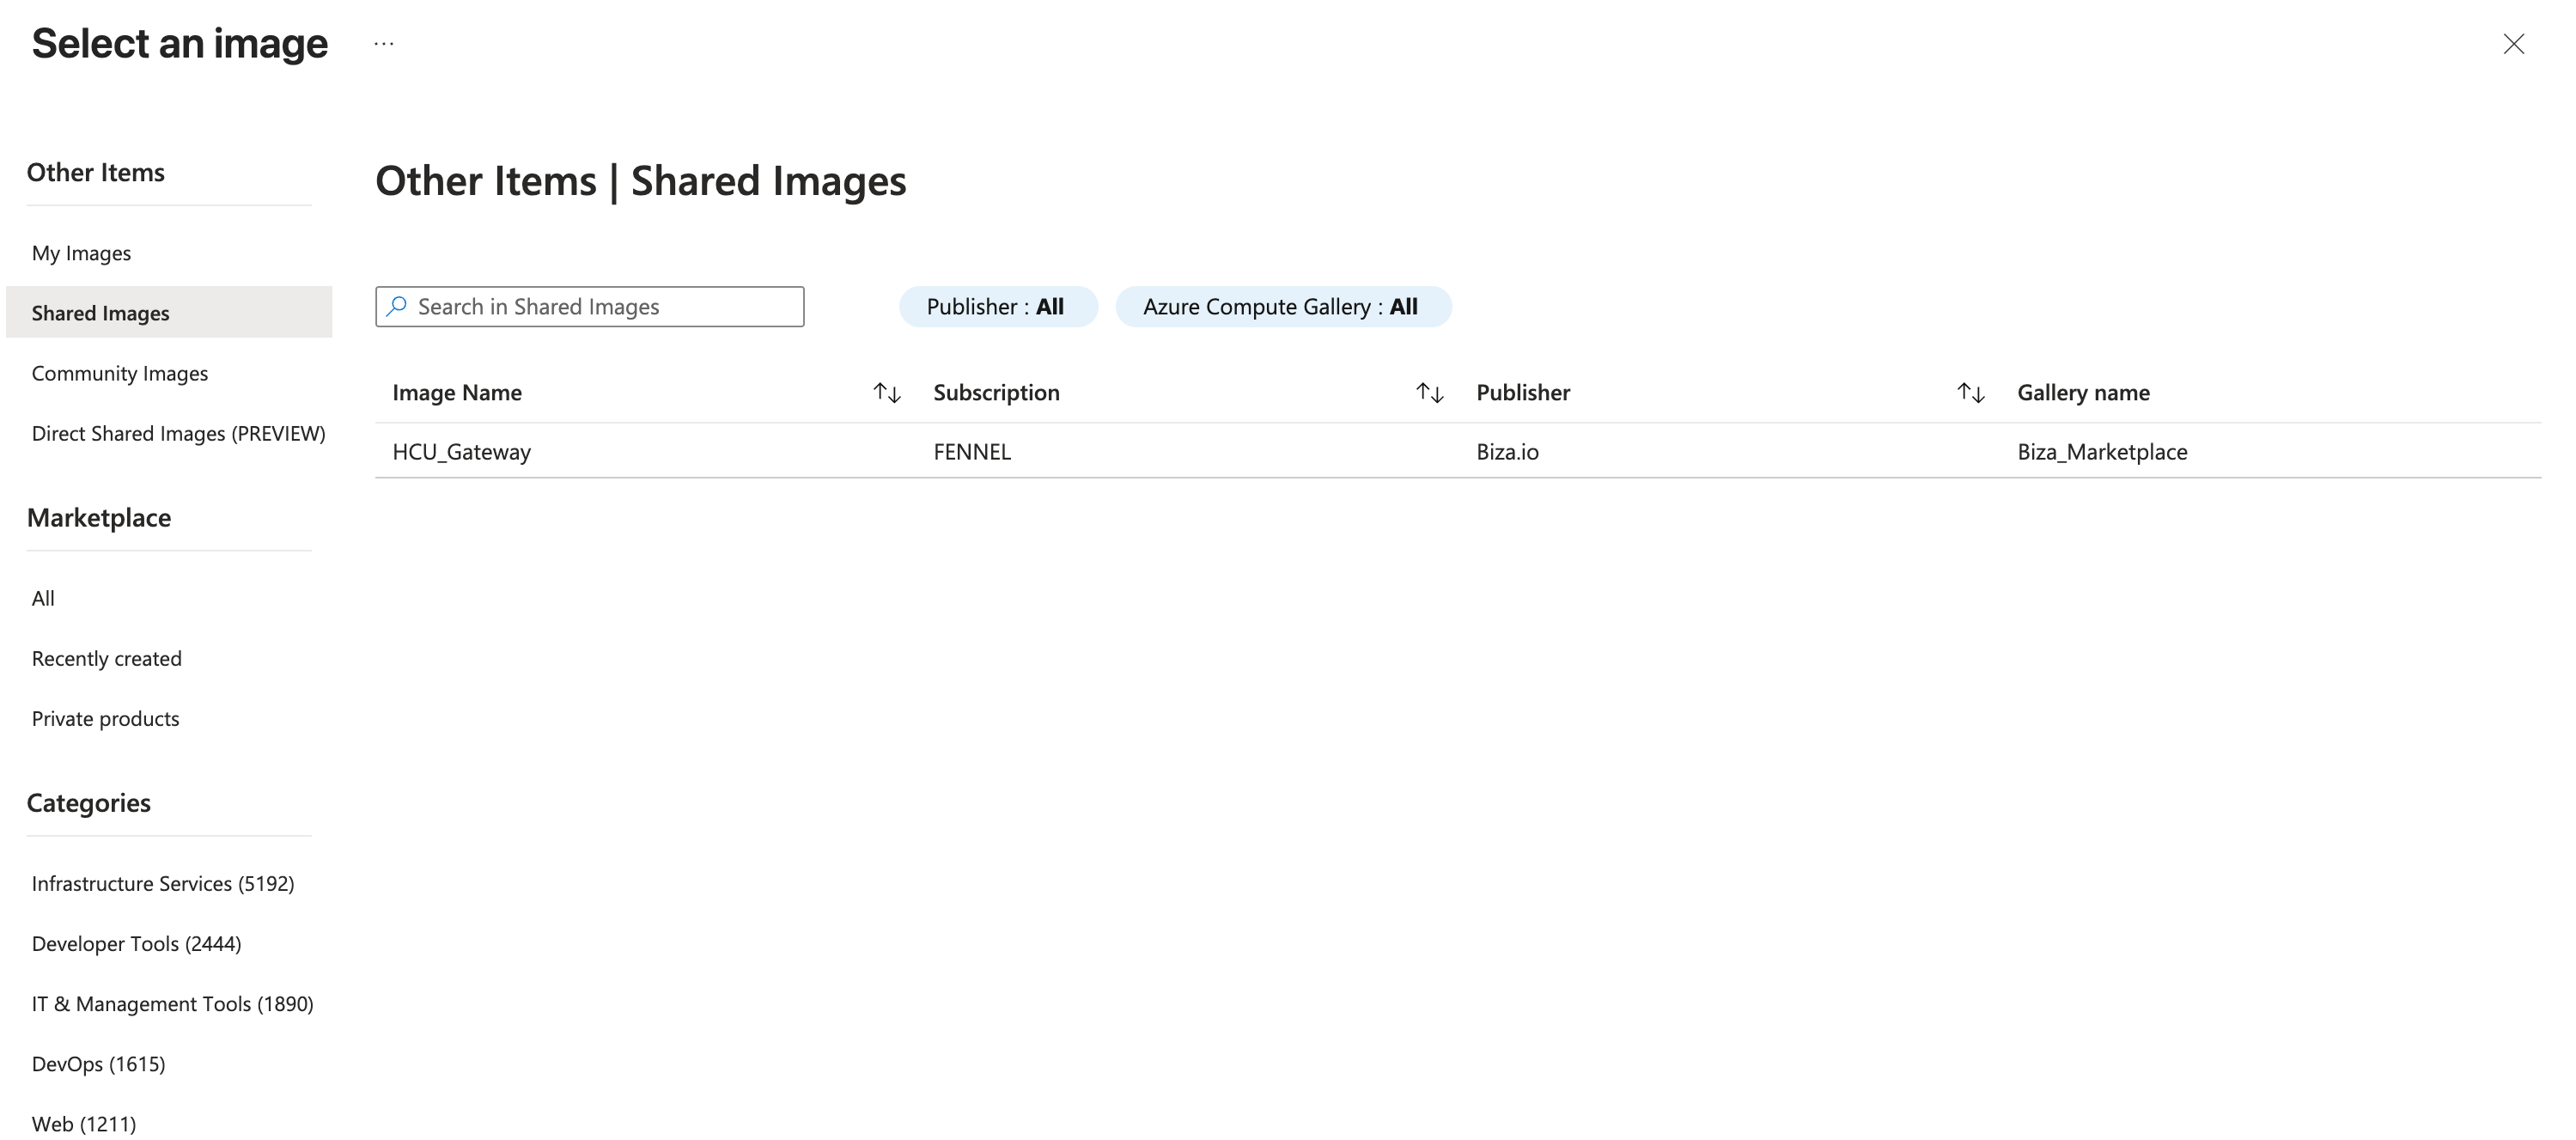
Shared Image Gallery
Virtual Machine Scale Set (VMSS) Create
Create a Virtual Machine Scale Set within the same resource group.
- Within Basics:
- Specify the number of availability zones you require.
- Specify the Image as
Biza_Marketplace/HCU_Gateway/latest. - Use the recommended size of Standard_B1s — it is the right-sized SKU for this image. The smaller Standard_B1ls may not provide sufficient memory for the OS and HAProxy.
- Under Scaling, set Scaling mode to Manually update the capacity and set the instance count to 1 for Non-Production or 2 for Production environments.
- Specify Administrator account details. While this is not generally used (and we recommend SSH access is blocked by a firewall) it may be useful for diagnostics.
- Specify License type as Other.
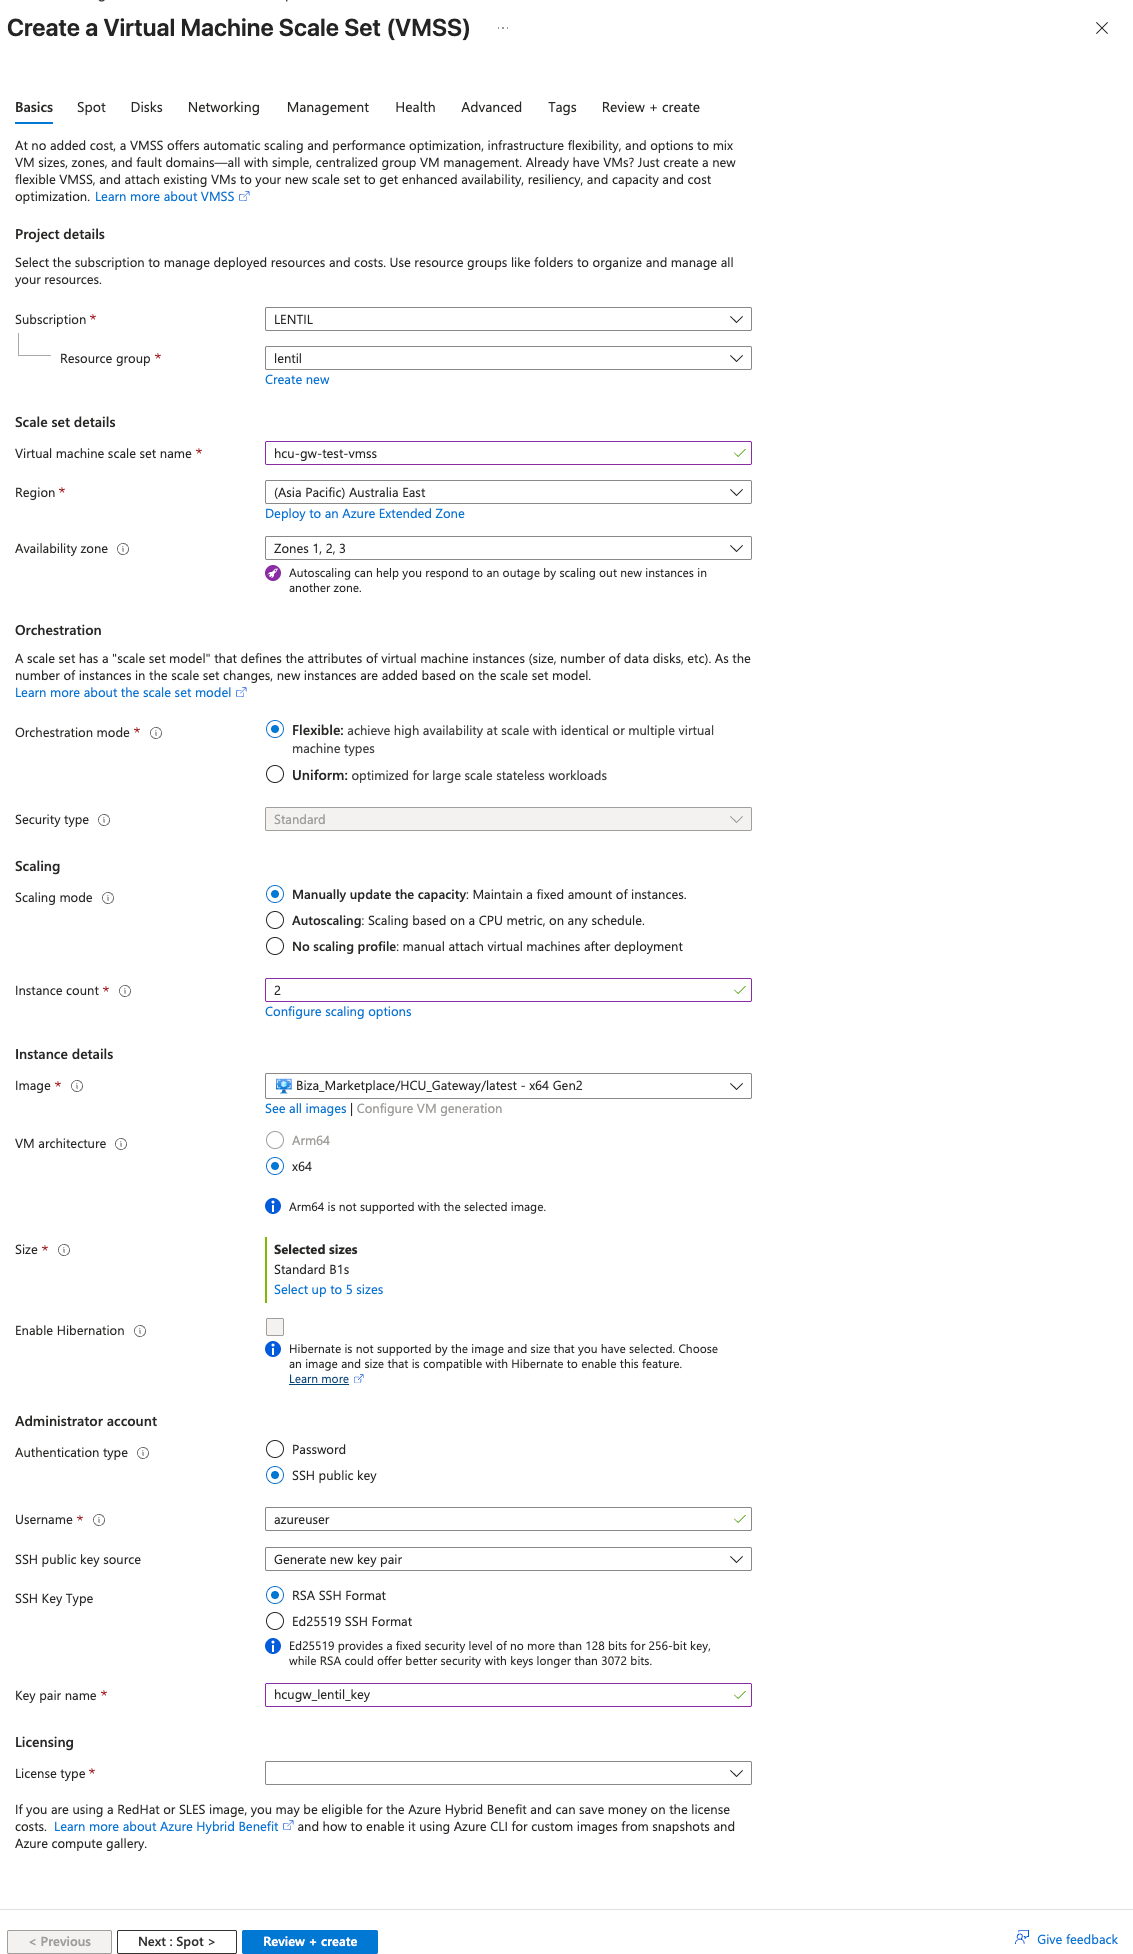
Create VM Scale Set Basics
-
Within Spot:
- No action required — leave Spot disabled. The HCU Gateway is a long-lived appliance and should not be subject to eviction.
-
Within Disks:
- (Recommended for Cost Reduction) Specify Standard HDD (locally-redundant) as the device will not generally write to disk.
- Enable Encryption at host to ensure all data written to temporary disks and OS/data disk caches is encrypted at rest.
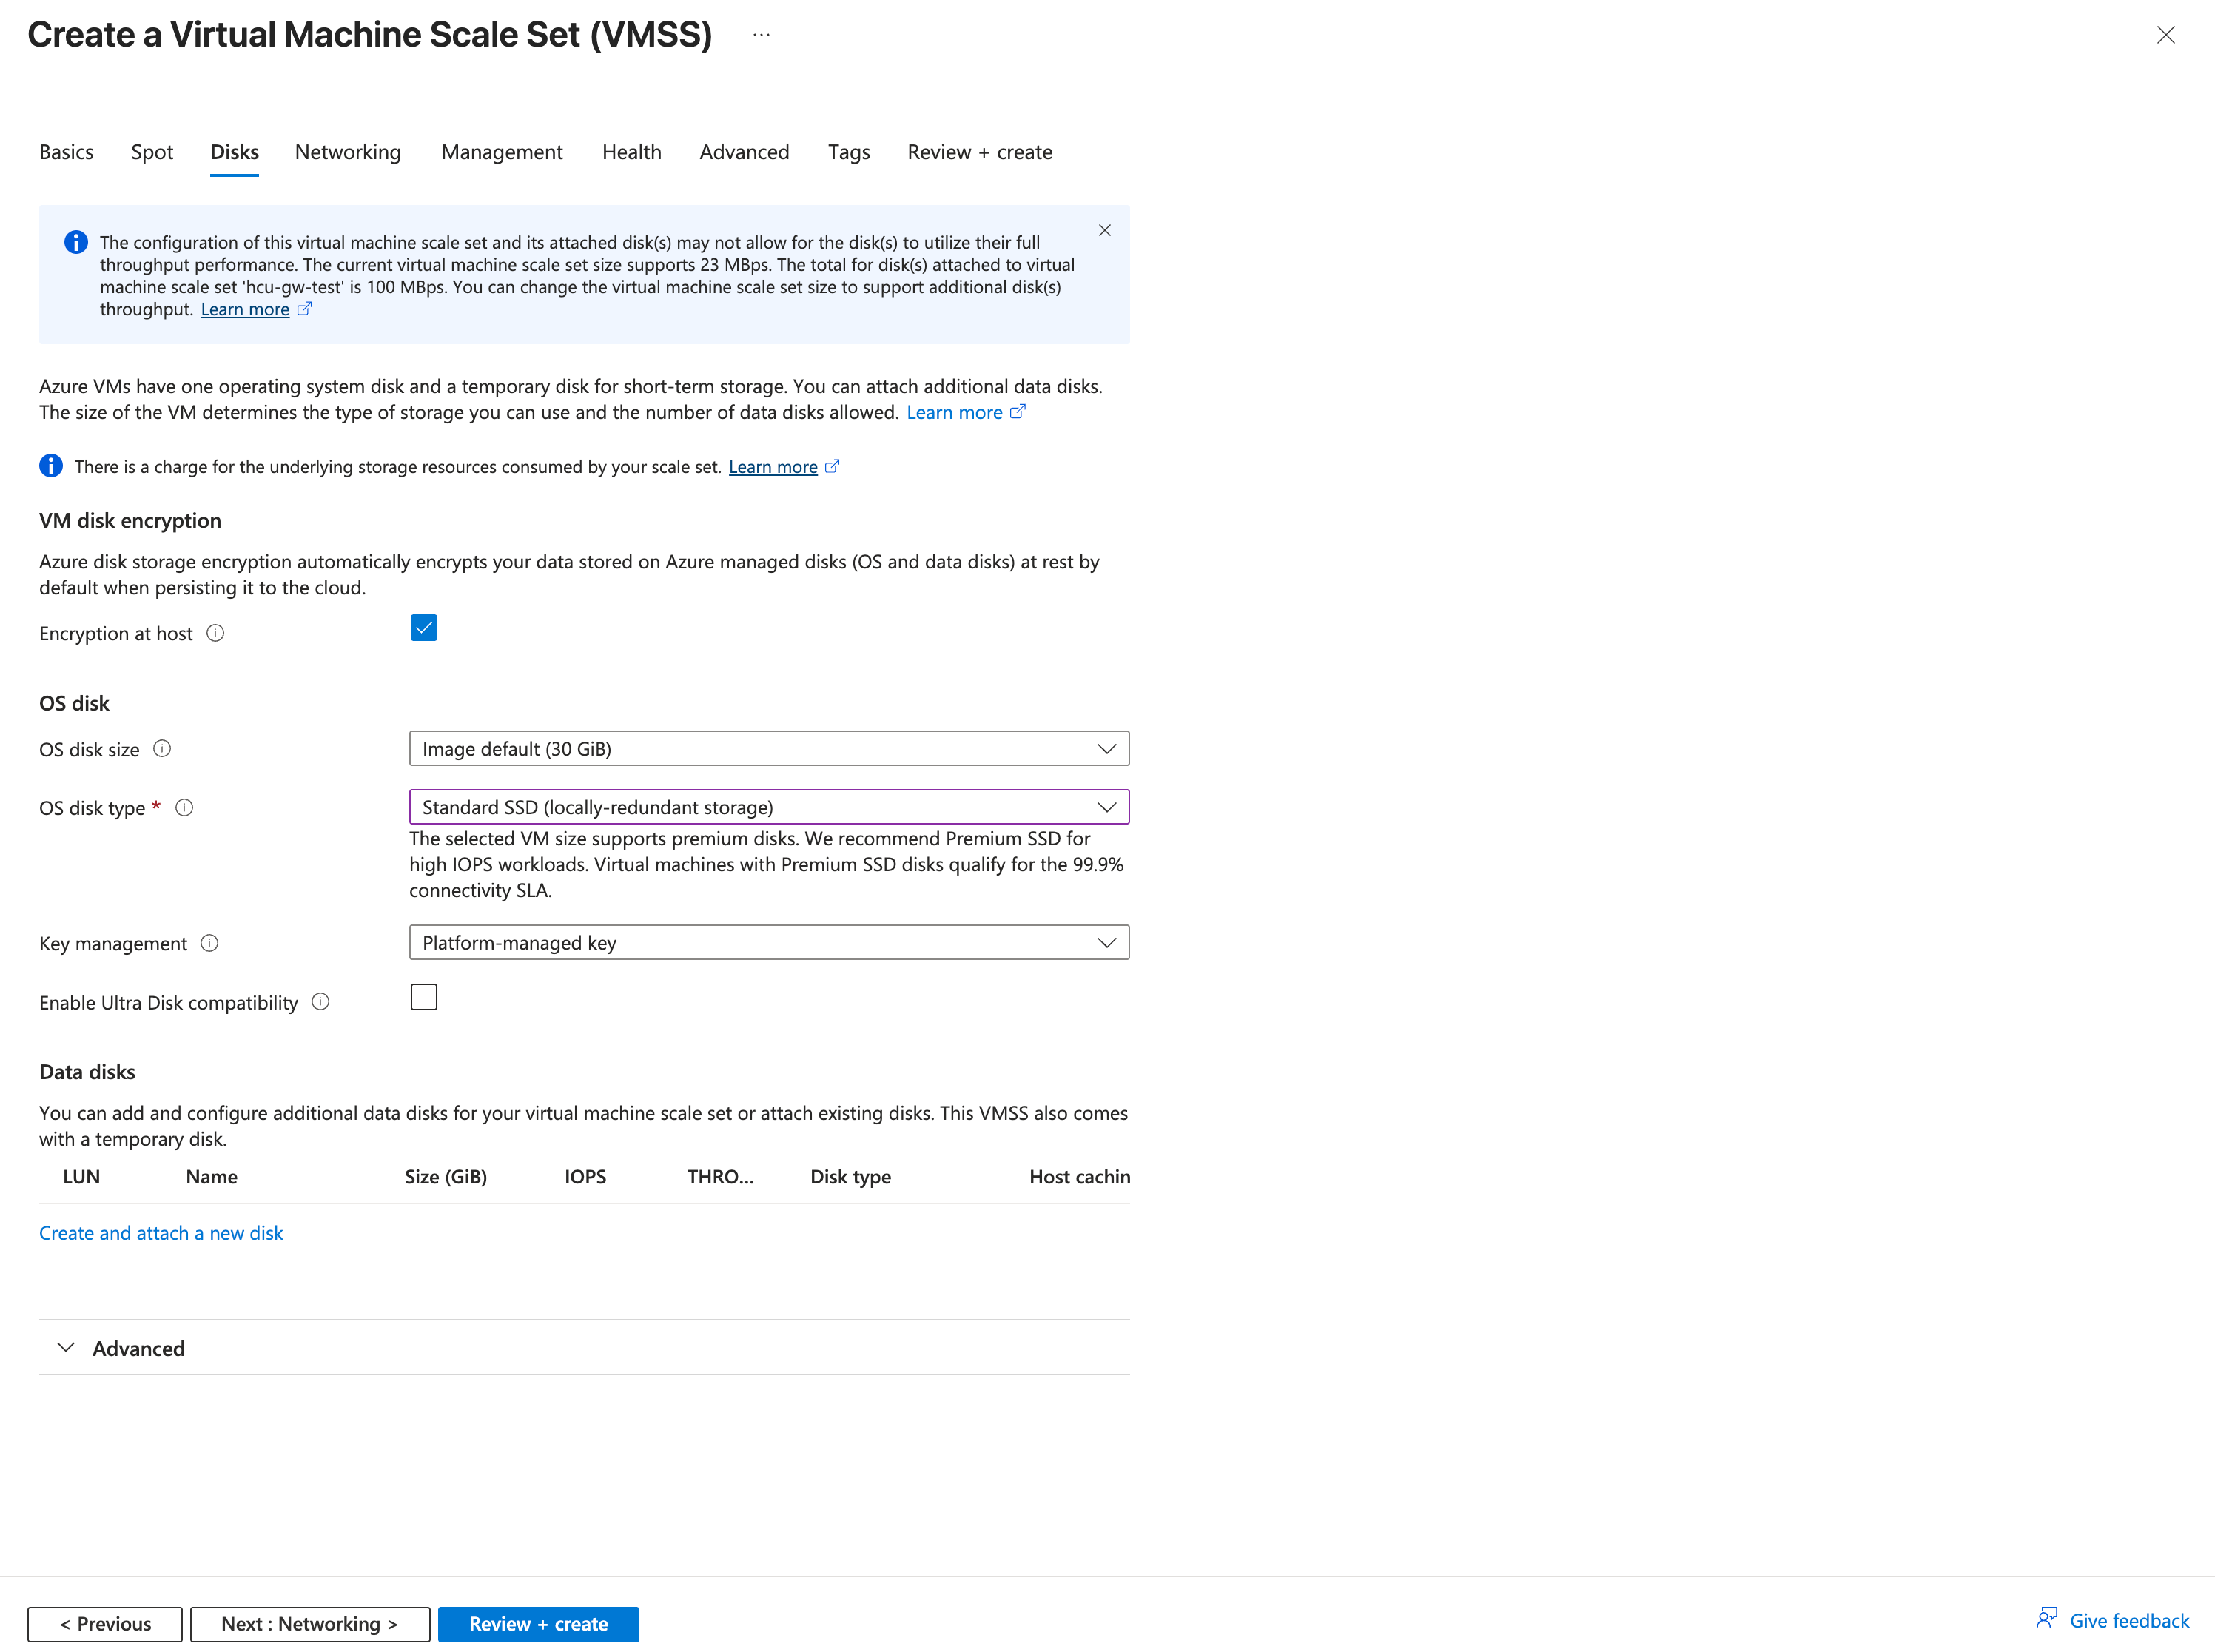
Create VM Scale Set Disks
- Within Networking:
- Specify the Virtual Network the existing Load Balancer belongs to.
- Check Use a load balancer.
- Specify Azure load balancer.
- Select the existing Load Balancer.
- Create a new backend pool called
HCU_Connectivity.
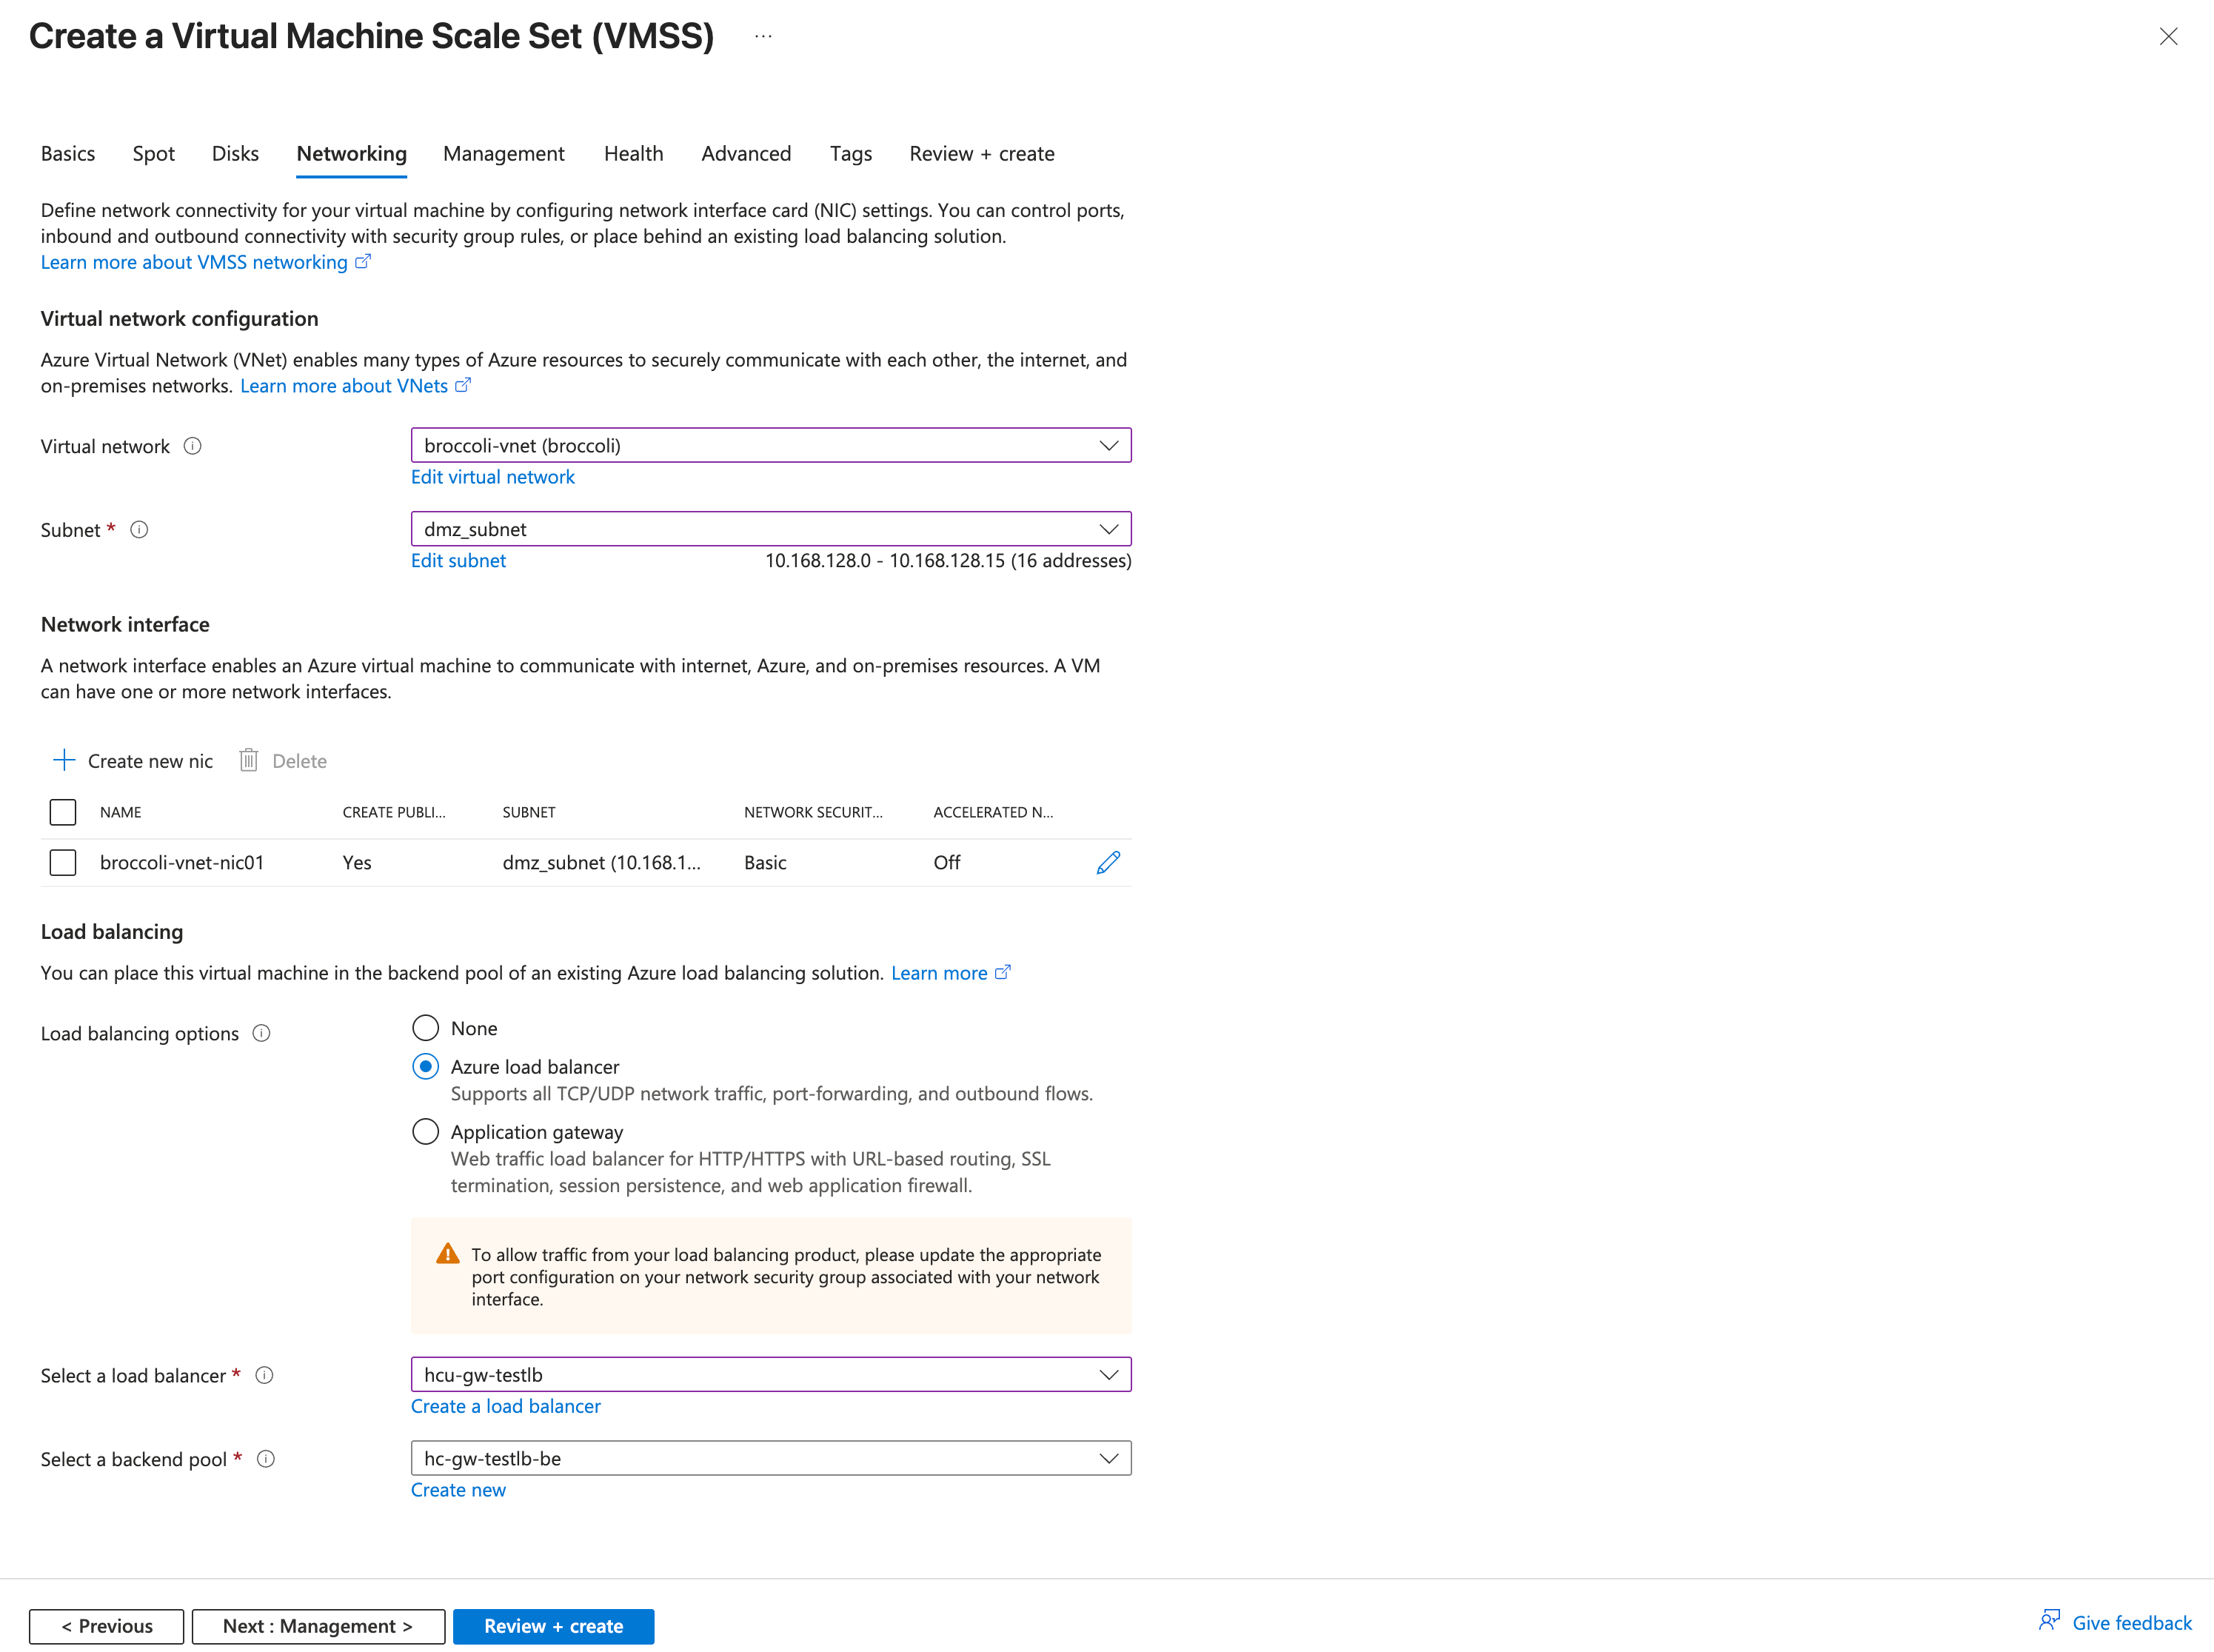
Create VM Scale Set Networking
- Within Management:
- No changes required — leave all settings at their defaults.
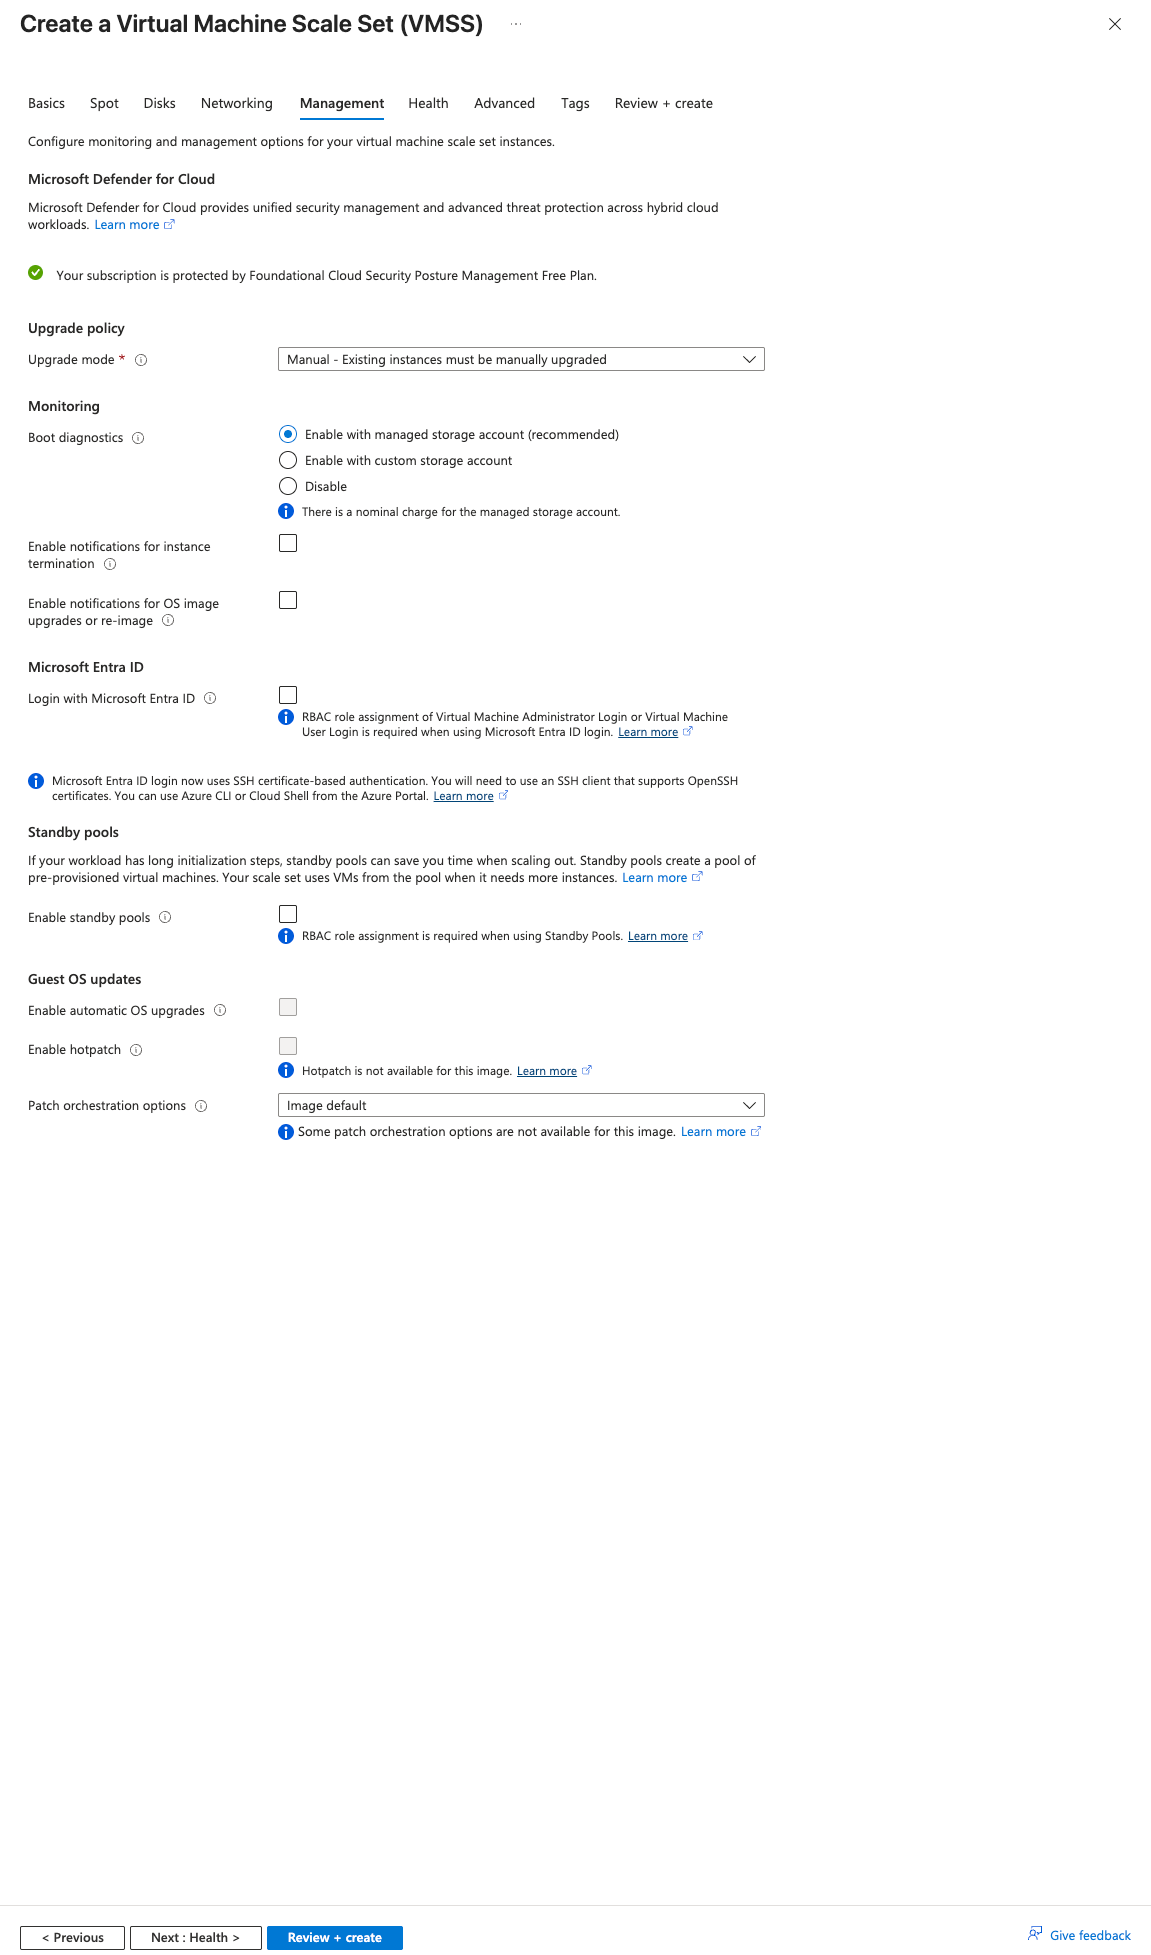
Create VM Scale Set Management
- Within Health:
- Check Enable application health monitoring.
- Specify Application health extension.
- Protocol of HTTP.
- Port Number of 11000 (or your configured
haproxy.port). - Path of
/monitor.
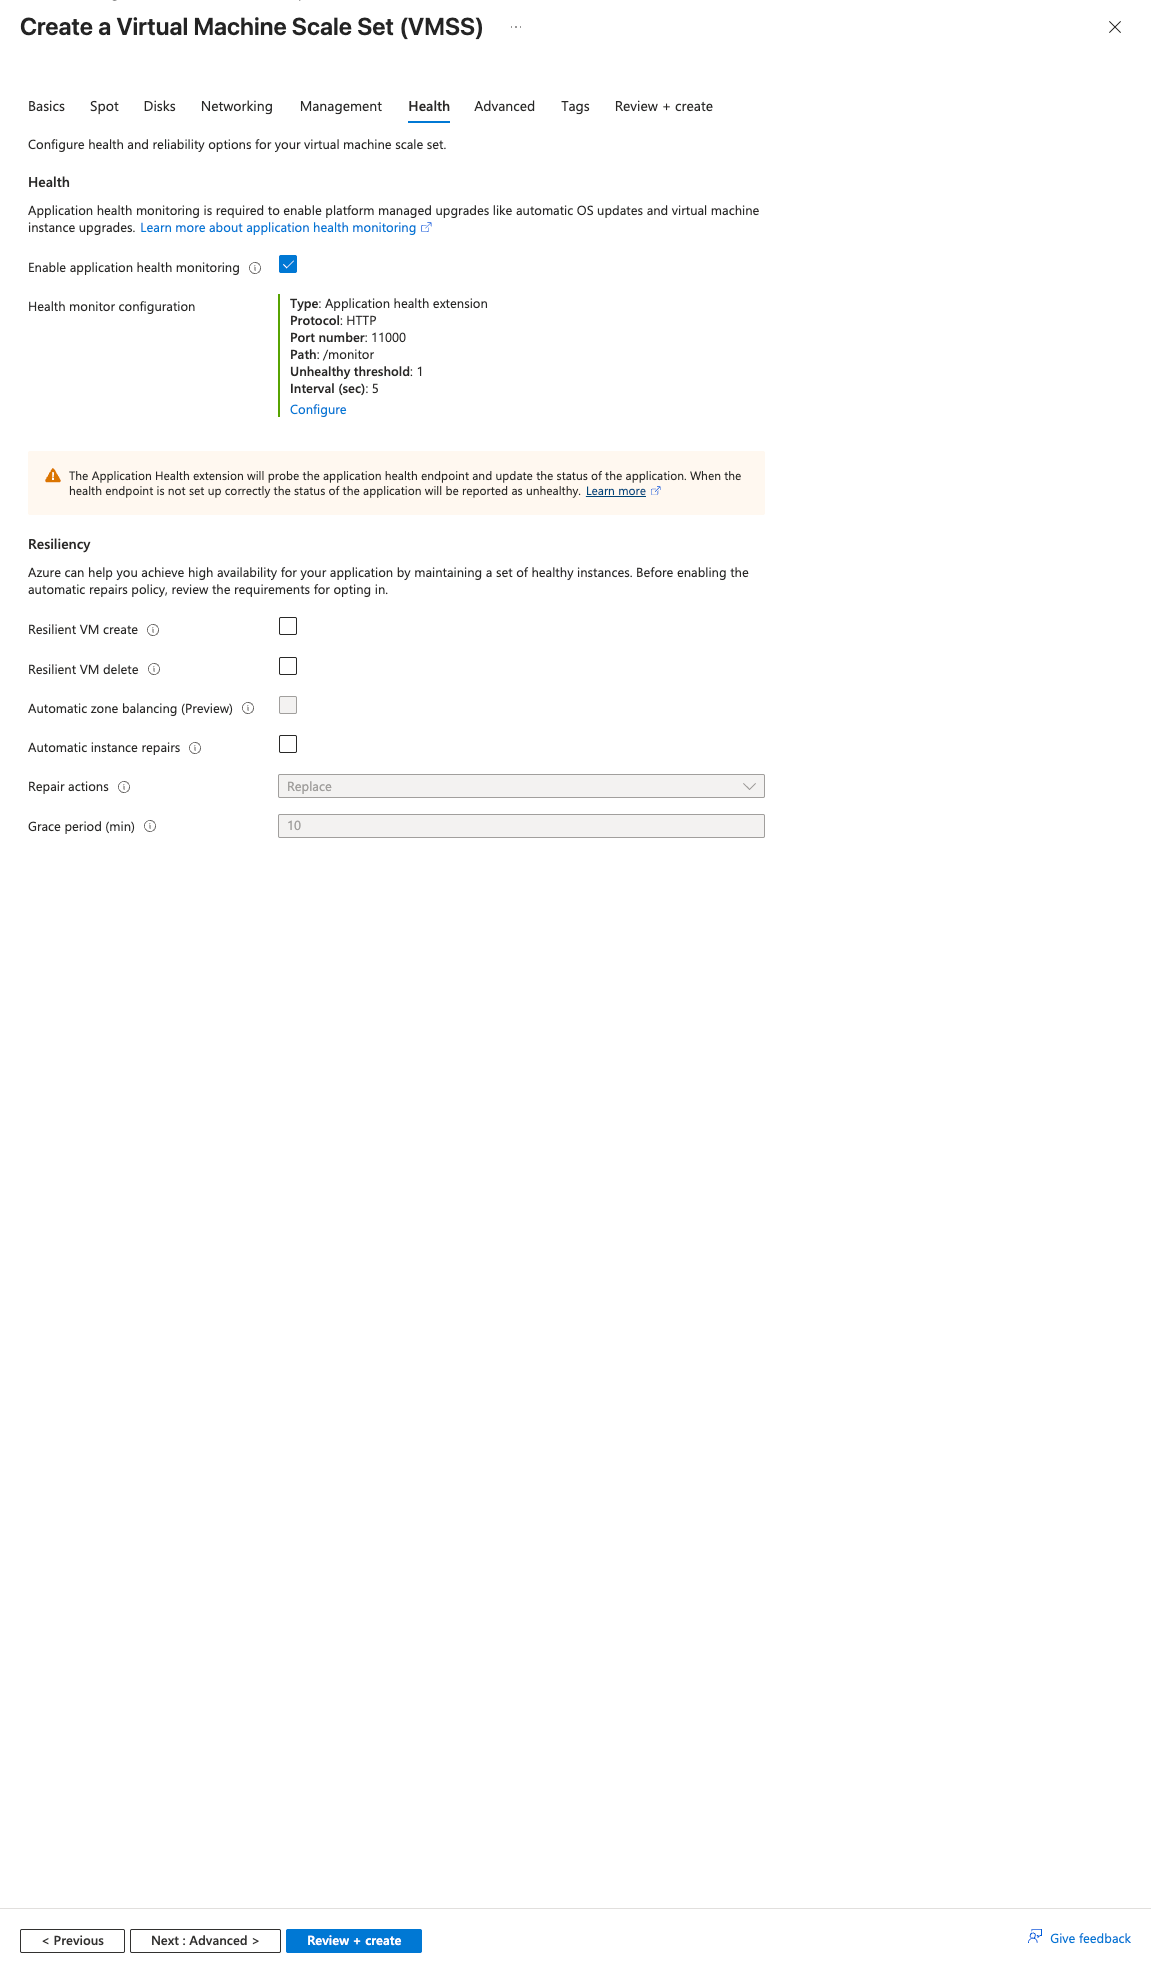
Create VM Scale Set Health
- Within Advanced:
- Check Max spreading.
- Check Enable user data.
- Paste the (updated) user data configuration into the User data box.
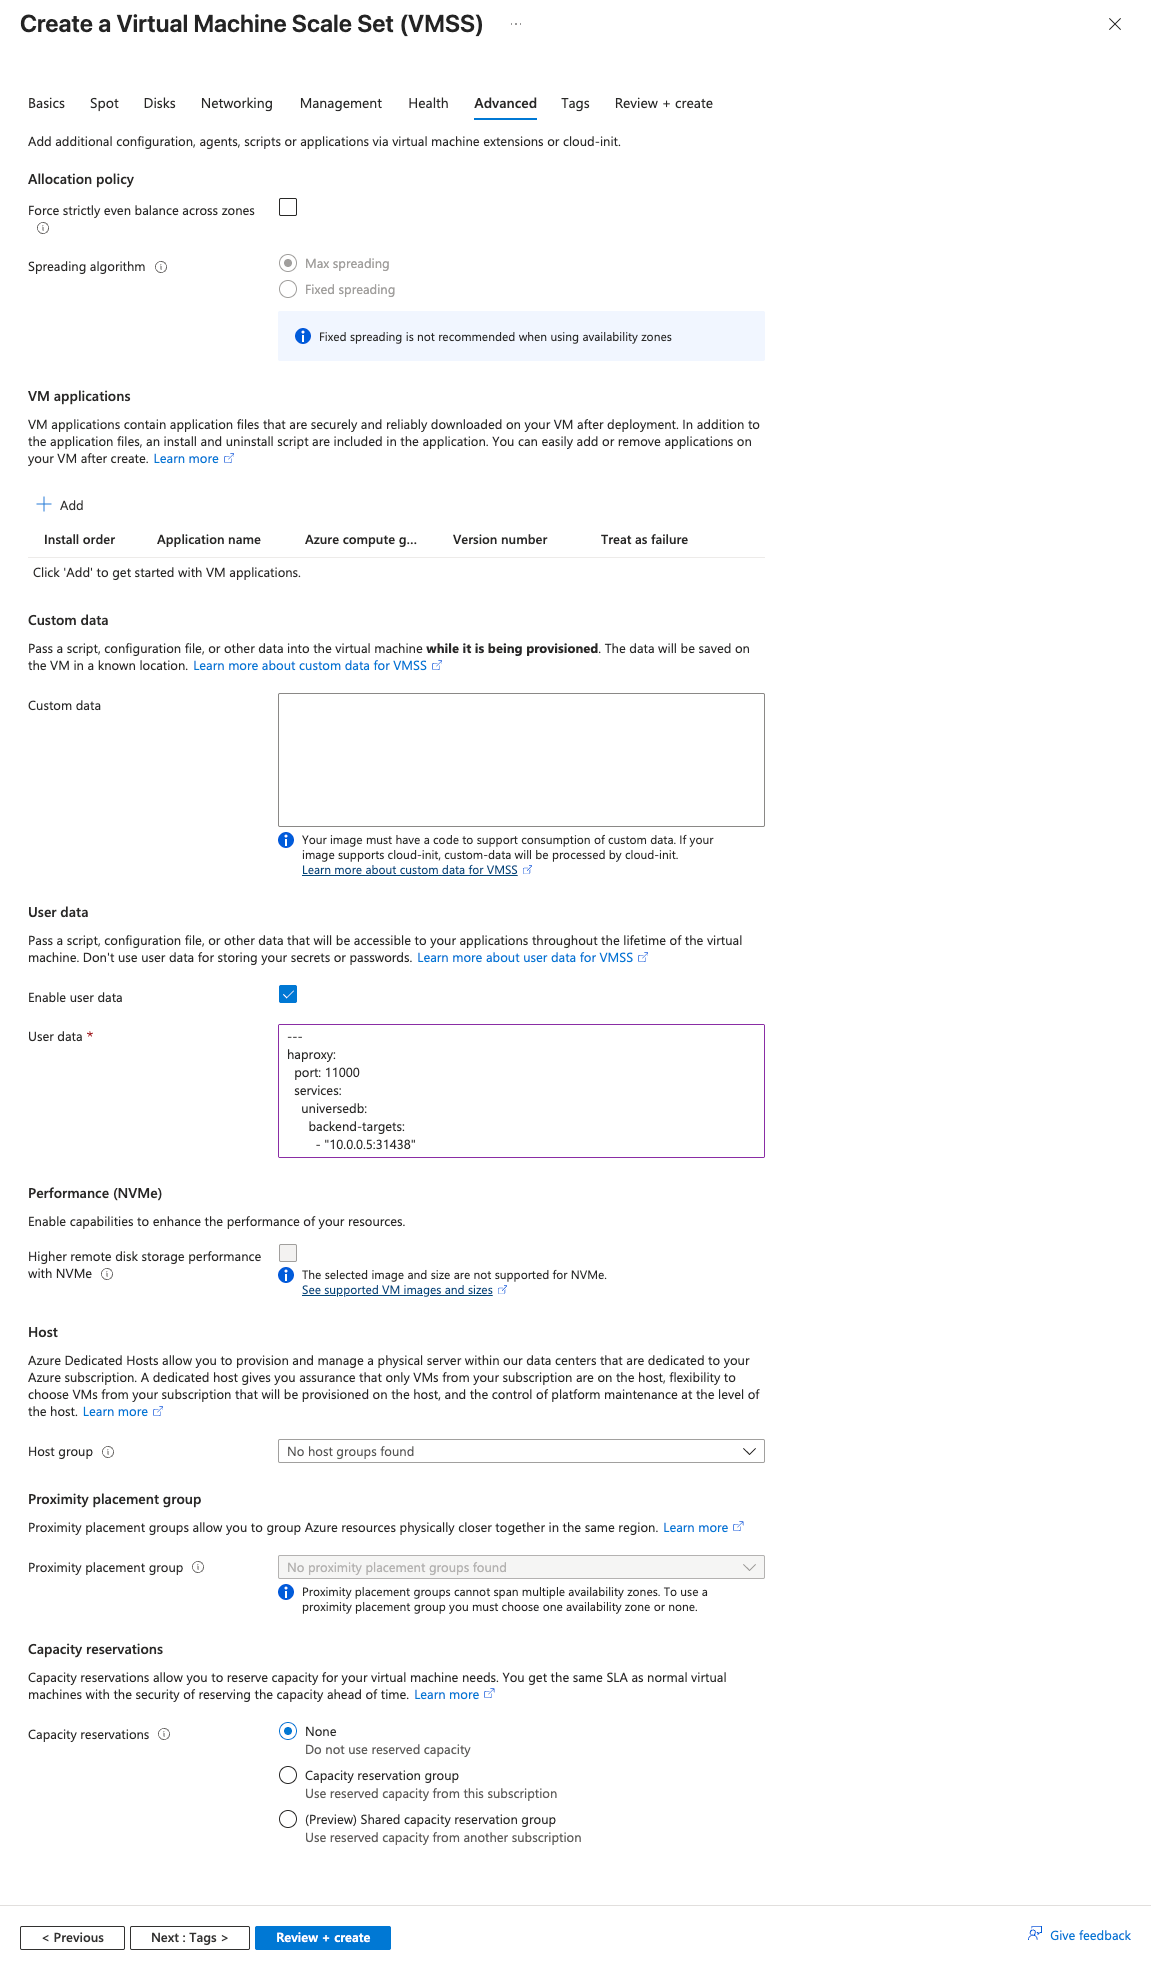
Create VM Scale Set Advanced
- Within Tags:
- Specify any tags you wish to provide.
- Click Review and Create — the VM Scale Set should succeed with Validation Passed.
- Click Create.
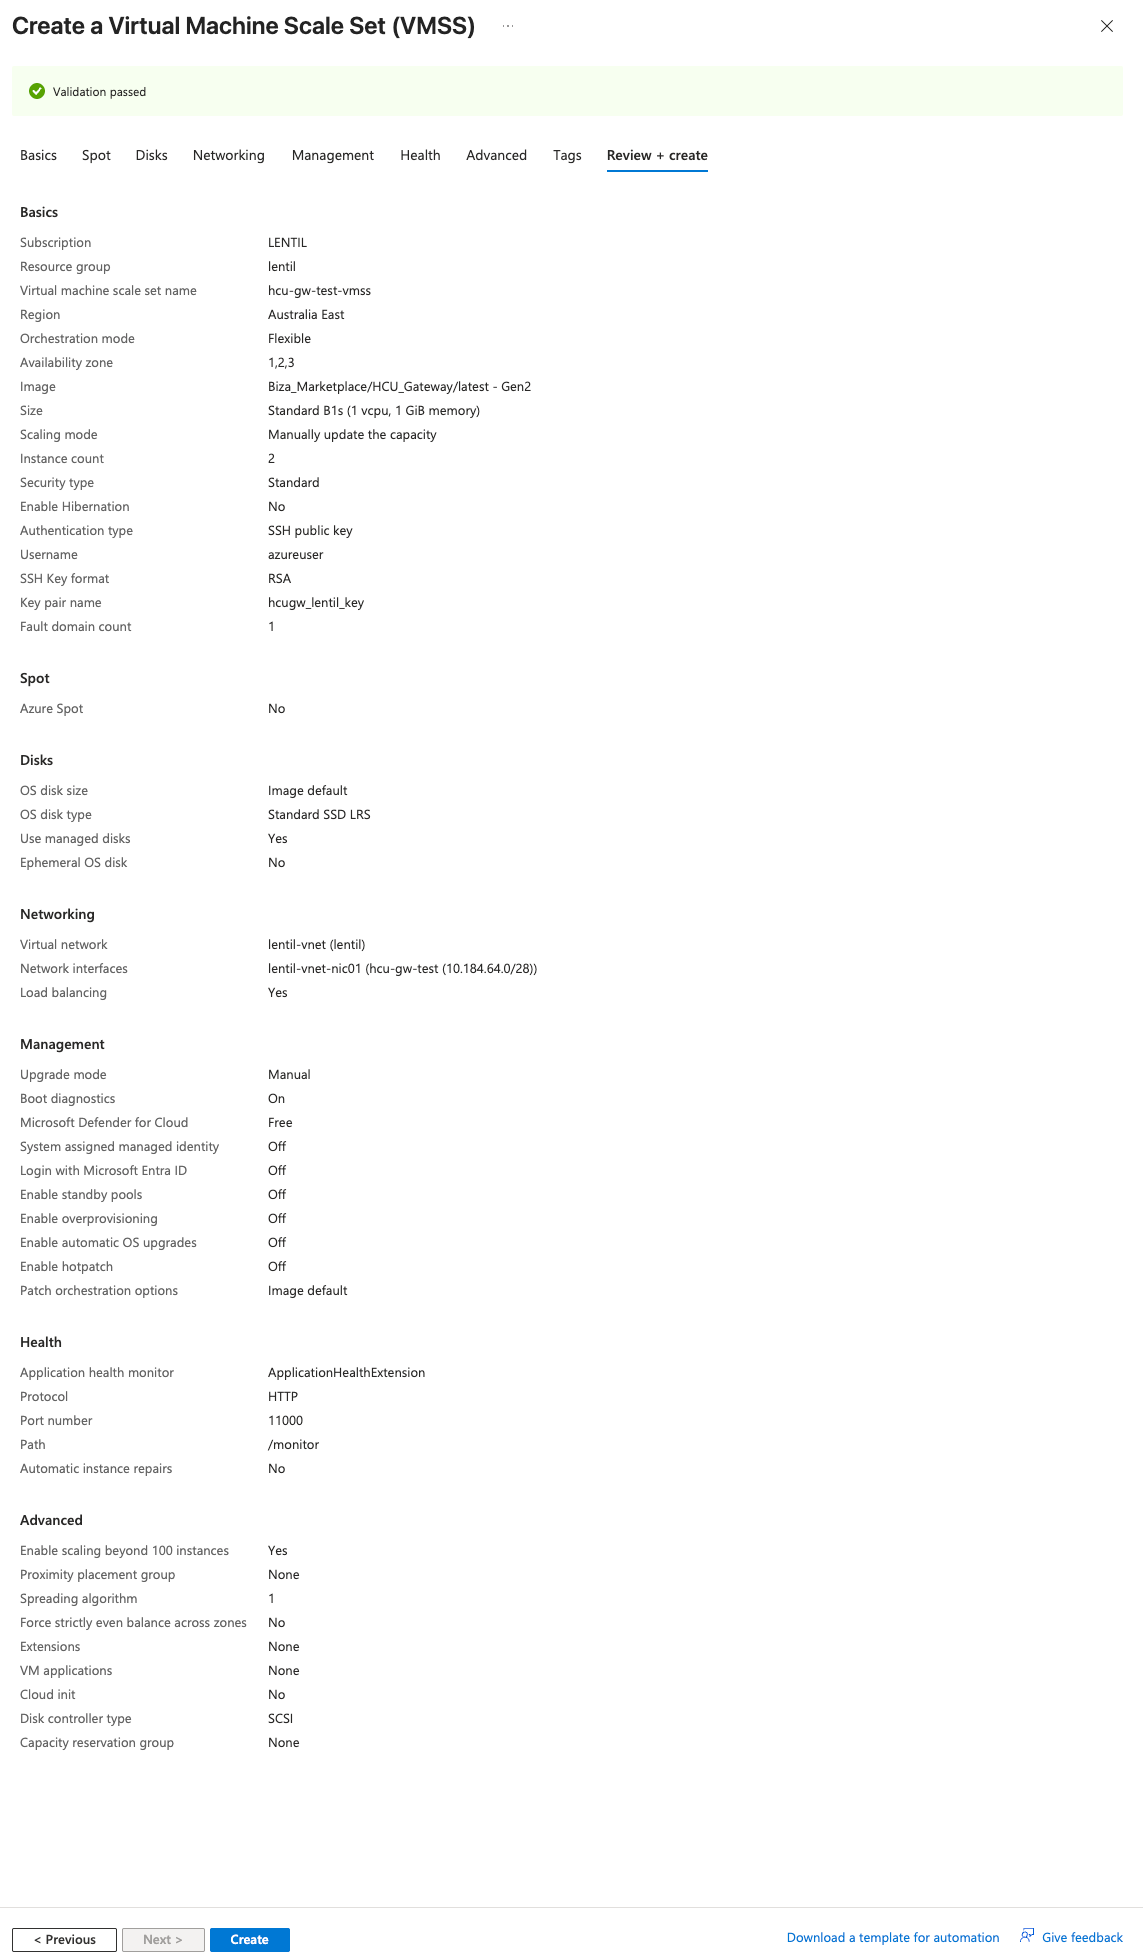
Review and Create
VMSS Firewall Rules
1. Once the VM Scale Set is created, set up inbound and outbound firewall rules.
2. Open the newly created VM Scale Set and navigate to Networking → Network settings.
Your subnet may already have its own Network Security Group due to your organisation's Azure policies (as shown in the screenshot below), in addition to the NIC-level "Basic" NSG that Azure auto-generates for the VMSS. Traffic must pass both (inbound: subnet → NIC; outbound: NIC → subnet), so rules added to only one can still be blocked by the other.
Safest default: add the rules below to both the subnet-level NSG and the NIC-level NSG. This matches the strictest policy either NSG may enforce. Only consolidate or delete one of the NSGs if you know your environment's policies allow it.
3. Add inbound port rules for your configured services with Source and Destination set to Any:
- Magic Link (if enabled): port
8080TCP - Monitor + UniVerse: ports
11000-11001TCP
4. Add outbound port rules scoped to your backend targets. Set Destination to the exact backend IP (e.g., 10.184.32.23) and Destination port to the port in your backend-targets (e.g., 11001).
5. Apply the same rules to the second NSG (see warning above).
The instructions above don't specify a Source, leaving it at the default of Any, so that you can hit instance IPs directly from a jump host or your laptop in the next section (Load Balancer Configuration) to verify HAProxy is healthy before involving the Azure LB. The screenshot below shows the rules after they've been tightened up in the final Post-Setup Hardening step — don't worry if your rules look more permissive at this stage.
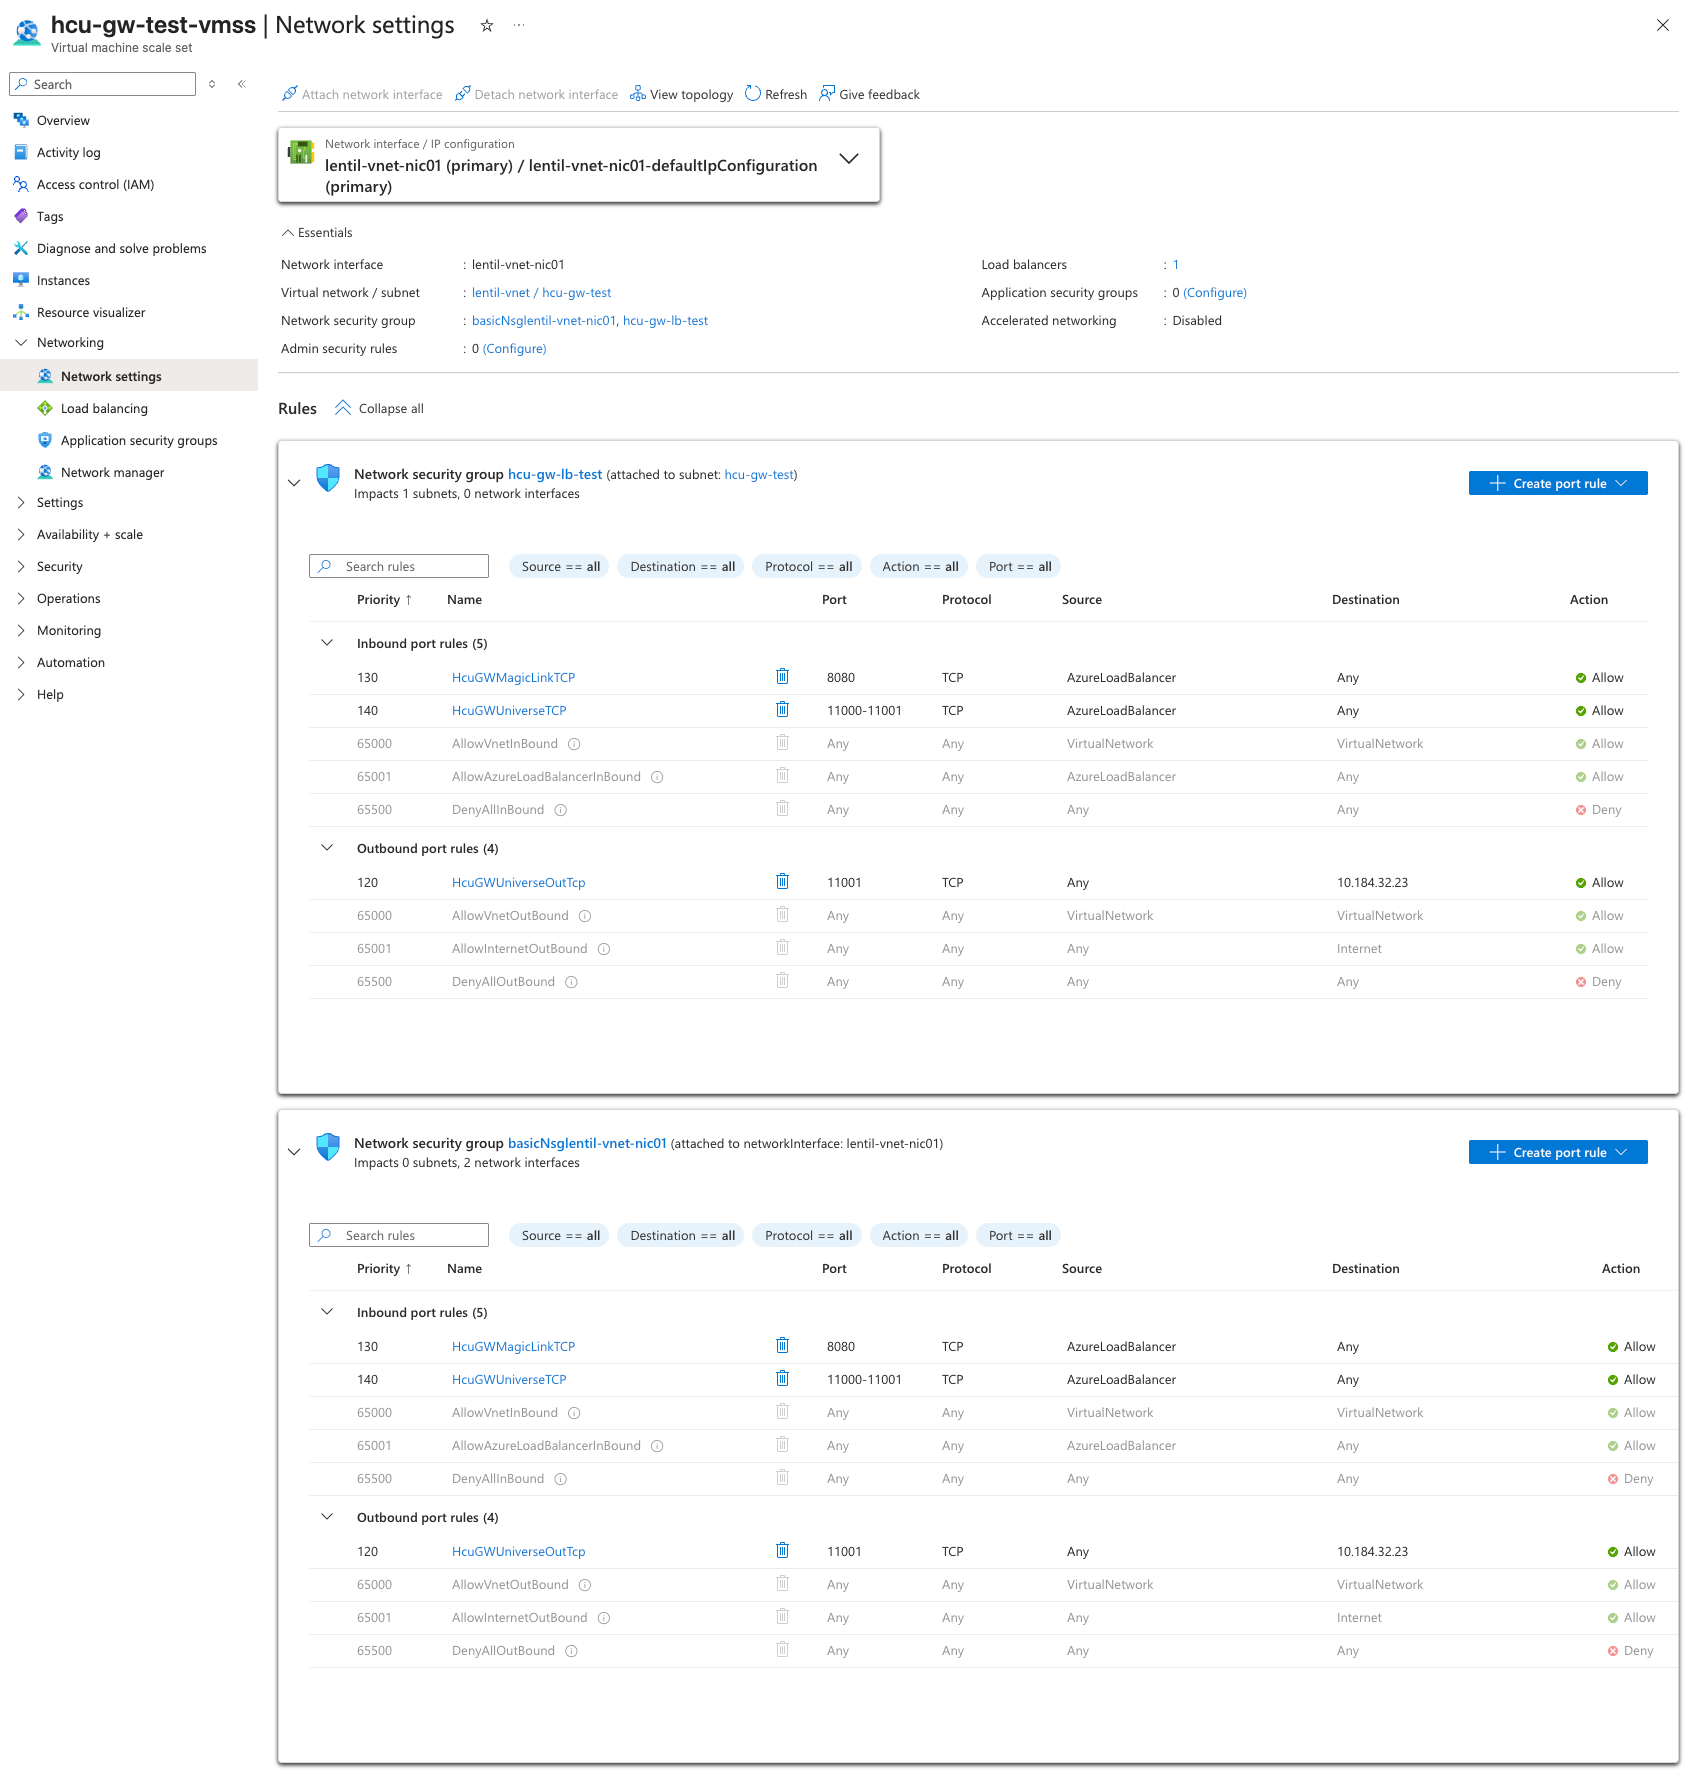
Network settings — final hardened state of both NSGs (inbound Source = AzureLoadBalancer; outbound scoped to backend IP:port)
Load Balancer Configuration
1. Verify the Scale Set has spawned 1 or more VMs from the image.
2. Select one of the instances and find the IP.
3. Using a device able to access the target IP, verify the HAProxy monitoring page is available at http://<instance-ip>:11000/monitor.
4. Within the Load Balancer, verify that a Backend Pool with the running instance(s) has been created from the VMSS Networking step.
5. Create a health probe:
- Name:
HCU_HealthProbe - Protocol: HTTP
- Port: 11000 (or your configured
haproxy.port) - Path:
/monitor
This load balancer health probe is separate from the Application Health Extension configured in VMSS Create → Health — both are required. The VMSS extension triggers instance auto-heal and gates rolling upgrades; this LB probe decides which backends receive traffic.
6. Create load balancing rules for each service to be exposed:
-
UniverseDB:
- Port:
11001 - Backend port:
11001 - Backend pool:
HCU_Connectivity - Health Probe:
HCU_HealthProbe
- Port:
-
Magic Link (if enabled):
- Port:
8080 - Backend port:
8080 - Backend pool:
HCU_Connectivity - Health Probe:
HCU_HealthProbe
- Port:
-
Monitoring (Preferred):
- Port:
11000 - Backend port:
11000 - Backend pool:
HCU_Connectivity - Health Probe:
HCU_HealthProbe
- Port:
7. Once this is completed it should be possible to load the /monitor page via the load balancer.
Post-Setup Hardening
Once the load balancer is verified to be working end-to-end and you no longer need to test instance IPs directly, tighten the inbound NSG rules. Direct-instance access is no longer required — all legitimate traffic arrives via the Azure load balancer.
1. Navigate back to the VM Scale Set's Networking → Network settings.
2. For both NSGs (subnet-level and NIC-level), edit the inbound rules created in VMSS Firewall Rules (HcuGWMagicLinkTCP and HcuGWUniverseTCP):
- Change Source from Any to AzureLoadBalancer.
- Leave Destination, Port, and Protocol unchanged.
3. Save and verify the LB-fronted endpoints (/monitor, Magic Link, UniVerse) still respond.
For environments with stricter network policies, replace the AzureLoadBalancer service tag with an Application Security Group containing only the load balancer's frontend IPs (or any other approved sources). This gives you a single named handle to reference across NSG rules.
Post-install Configuration
The following configuration applies to all deployments, including both new installations and upgrades.
MyViewPoint Configuration Change
With the A2U Gateway, MyViewPoint connected directly to the Biza Management API for dashboard SSO tokens, requiring a private link back to Biza. The HCU Gateway's Magic Link service removes this requirement — MyViewPoint now connects to the HCU Gateway locally within your network.
Update MyViewPoint's cdrConsentApiBaseUrl to point to the HCU Gateway's Magic Link endpoint via a DNS name that MyViewPoint can resolve (e.g., http://hcu-gateway.internal.example.com:8080).
The following MyViewPoint configuration values must match the HCU Gateway's magic_link user-data:
| MyViewPoint Config | HCU Gateway magic_link field |
|---|---|
cdrConsentApiUsername | basic-auth-username * |
cdrConsentApiPassword | basic-auth-password * |
cdrConsentApiBaseUrl | http://<hcu-gateway-dns>:<magic_link.port> * |
*you will require these outputs when installing MyViewPoint.
Upgrading
Versioning
HCU Gateway images are published to the Biza_Marketplace Shared Image Gallery under semantic versions (e.g., 3.0.1, 3.0.2). Azure maintains a latest alias that always resolves to the most recently published version — this is what the guide references as Biza_Marketplace/HCU_Gateway/latest, so a VMSS built against latest will pick up the newest image on its next manual upgrade.
If you need to pin to a specific version for change control, reference it directly (e.g., Biza_Marketplace/HCU_Gateway/3.0.2) when creating or updating the VMSS.
Please request access to the image by contacting us via our support desk.
Release Notifications
Biza will contact you directly, via your account manager or email, when a new HCU Gateway version is published, along with release notes covering any behavioural changes or user-data adjustments you may need to make. There is no self-service subscription channel; upgrades are coordinated out-of-band.
Performing an Upgrade
To upgrade a running VMSS to the latest published version:
1. Search for VMSS in Azure.
2. Open the HCU Gateway VMSS.
3. Select Instances from the list of settings on the left.
4. Select all virtual machine instances.
5. Click the Upgrade button.
Ensure the VM instances are upgraded successfully to the latest version published by Biza.
Azure provides guidance for performing manual upgrades on Virtual Machine Scale Sets. See Azure documentation.
Upgrading from A2U Gateway
The HCU Gateway replaces the A2U Gateway. The key differences are:
| A2U Gateway | HCU Gateway | |
|---|---|---|
| Image | Biza_HaaS/biza-haas-a2u | Biza_Marketplace/HCU_Gateway |
| Magic Link | Not available | Drop-in replacement for Management API SSO endpoint |
To upgrade from A2U, follow these steps.
1. Migration Steps
The migration reuses the existing load balancer that fronts the Private Link Service. The A2U VMSS and A2U_Connectivity backend pool stay in place until the cutover is verified, allowing quick rollback.
1. Deploy the HCU Gateway VMSS following Setup Procedure above. Use the same VNet/subnet so the new VMSS is reachable from the existing load balancer.
2. On the existing load balancer (the one used by the Private Link Service), perform the following Load Balancer Configuration steps:
- Create the new
HCU_Connectivitybackend pool referencing the new VMSS (as per Load Balancer Configuration). - Create the Magic Link load balancing rule (port
8080) pointed atHCU_Connectivity. This is net-new and doesn't exist on the A2U setup.
3. Coordinate a short outage window with Biza. During the window:
- Switch the existing Monitor (
11000) and UniVerse (11001) load balancing rules from theA2U_Connectivitybackend pool over to the newHCU_Connectivitybackend pool. - Biza will update your HaaS Space to HCU Gateway mode in the same window.
4. Verify end-to-end connectivity through the HCU Gateway (monitor page, UniVerse database, Magic Link SSO token issuance from MyViewPoint).
5. Once connectivity is verified and stable, the old A2U VMSS and the A2U_Connectivity backend pool can be deleted.
2. Update configuration
Update your MyViewPoint configuration to use the values define in the Post-install Configuration section.
No additional installation steps are required if the HCU gateway is already deployed.